

Inkscape tutorials | How to draw a candle
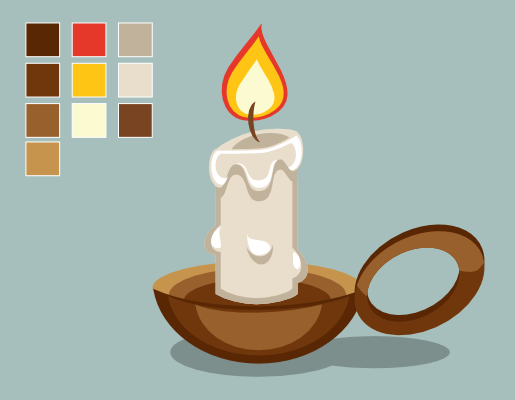
Let’s continue our ‘How to draw in Inkscape’ series with a candle tutorial. At the beginning we'll use basic shapes, gradually modifying them to fit our needs using Nodes Tool (F2) and path operations. Then we will prepare some art for simple flame animation. So, let’s do this!
Though I’ll be using Inkscape to show the process, the principles given below can be more or less applicable to drawing process in any other vector editor. This is not the only way, it's just how I do it.
Candle
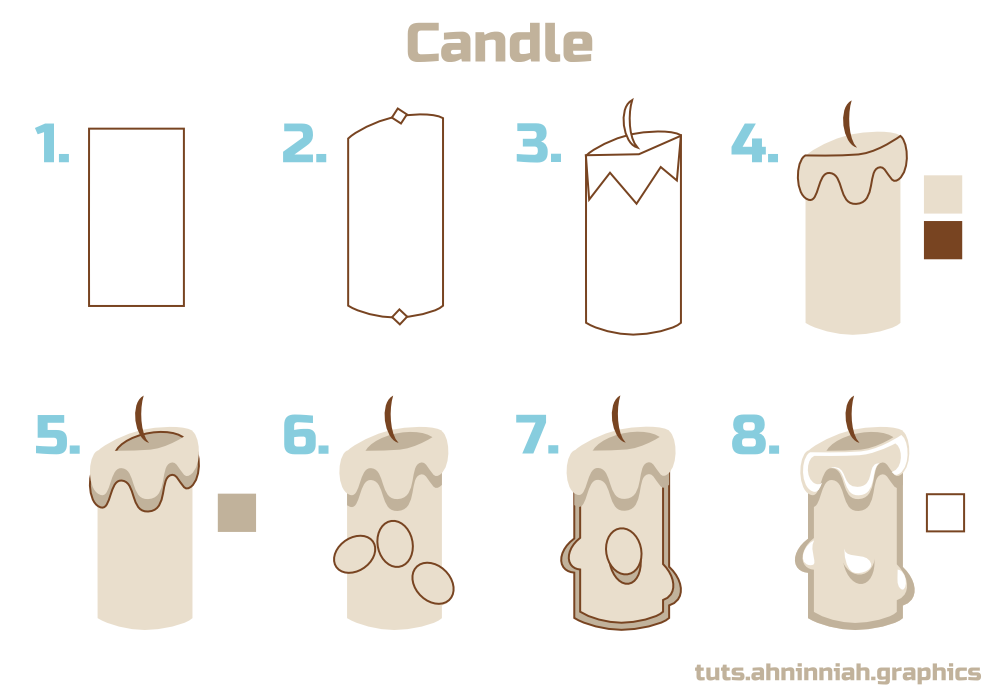
1. First of all we need to grab Rectangle Tool (F4) for base shape of our candle. It’s much easier to draw using simple shapes than to draw from the scratch on your own.
2. Convert rectangle to path (Shift + Ctr l+ C), round out the bottom line and make the upper edge slightly slanted. Add aditional nodes to get a better result.
3. As our candle burns, the wax begins to melt. Let's add this detail to our candle to make it look more realistic.Take Bezier Tool (Shift + F6) and form a shape using ‘from node to node’ method. Also, do not forget about the wick, which can also be drawn using Bezier Tool or a Pencil.
My pencil smoothing is set to 50%. With this setting, hand line is more curved, smooth and have a less number of nodes, so it’s much easier to edit its paths.
4. Select all melted wax nodes (except for the two top extreme nodes), make them smooth and adjust their position. There are many kinds of candles, their shapes and their colors. Here you can experiment for yourself, or use the most common colors like I did.
You can download SVG-file with color palette for practice here
5. Create a small hollow under the wick using Ellipse Tool (F5) and fill it with darker color. Lower the shape on several steps pressing Page Down key. Let’s add a shadow under the melted wax to make it more visible. Duplicate the original melted shape (Ctrl + D), fill it with darker color and position it under (Page Down) and slightly below the melted wax. Duplicate the candle shape, select melted wax shadow and go to Path > Intersection.
6. The next step is to add even more melted wax - this time it’ll be drops. Use Ellipse Tool to create oval shapes and place two of them along the edges of the candle. Select these two, candle shape and go to Path > Union. The third oval in the middle of the candle remains as it is.
7. To make the candle stand out, we’ll add an outline shape. Duplicate twice the candle shape (Ctrl + D), scale the upper one down, select both and use Path > Difference. Fill the result with darker color. Now let’s add the shadow under the middle drop. Duplicate it, fill it with darker color, place it under (Page Down) and slightly below the original shape.
8. The final touch is adding highlights to all convex portions of candle. For melted wax use the same technique as we used for candle's outline shape. For drops use either Bezier Tool or Pencil. It depends on what tool you prefer.
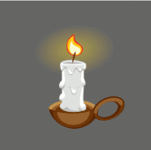
Candlestick
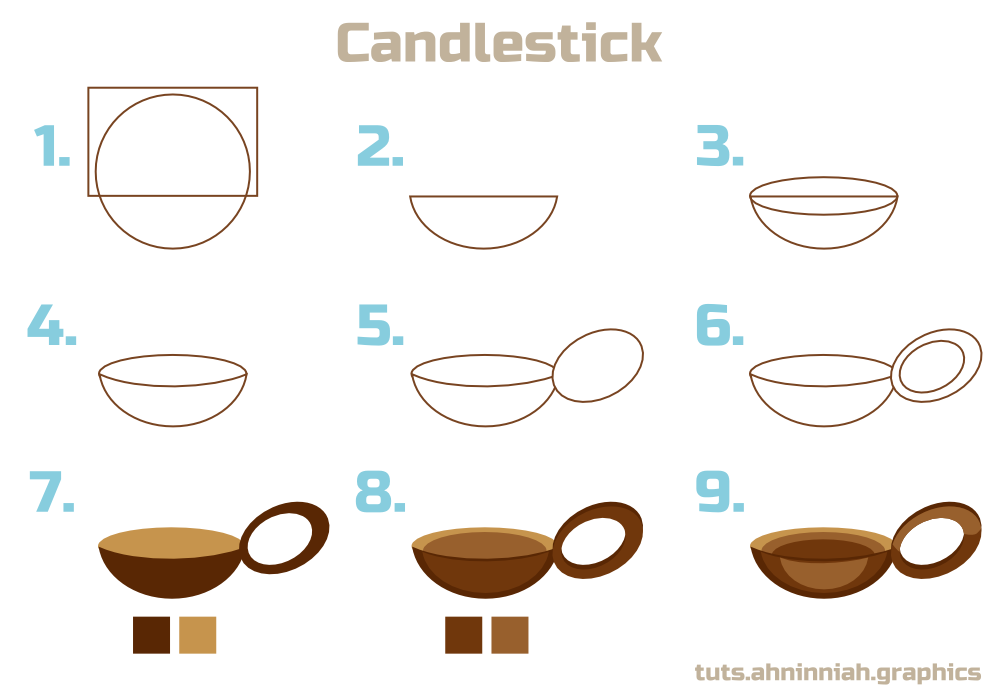
1-2. Draw a circle or an ellipse (F5). Form candlestick shape using rectangle and Path > Difference operation.
3-4. At such angle (side top view) we can see the inside of the candlestick. To show this through our drawing, create an ellipse and squeeze it like shown on the picture above. Then, you can either place it on top of the bottom candlestick shape or place it behind it and curve the upper line of bottom candlestick shape with Nodes Tool. I chose the second way (see video process).
5-6. To create a candlestick handle, use two ellipses and Path > Difference operation.
7-9. Coloring process includes three steps. To show the inner part of the candlestick use darker color. Reuse original shapes for adding volume (scale them down or use path operations with new created shapes).
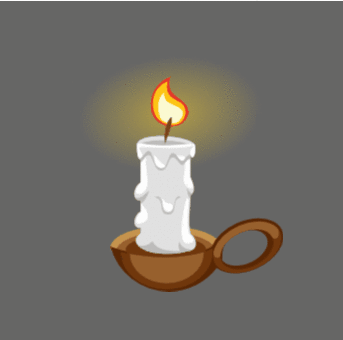
Candle Flame and simple flame animation
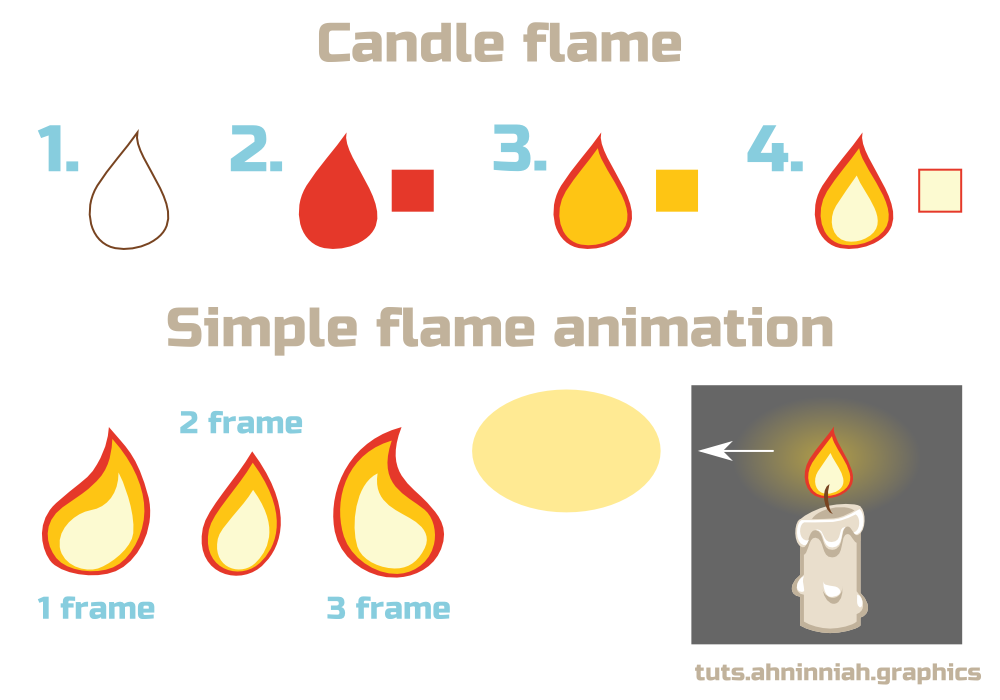
Candle flame consists of one simple shape, created either with Bezier (bottom nodes are smooth) or with Pencil Tools. The inner two shapes are duplicates of the first one, only scaled down and filled with different color. In some cases, you’ll need an additional nodes adjustment for shapes of the flame. The smallest shape is the most bright, because it’s a light source.
Simple flame animation can be achieved through drawing 3 types of the flame - these will be our frames. Additionally, for more vivid flame we could add some glow at the background. Here our glow is an ellipse with 50% of opacity (RGB: 255,212,39) and Radial gradient with transparent extreme nodes.
Combining all elements together, you can end up with something like this:
 |
 |
 |
It should be noted that the smaller the size is, the more realistic the flame looks.
Video process
Here is a video process of creating a candle. Take a look, if you got stuck on something.
That’s all for now! Please, post your results in the comments. And if you like this tutorial, please, share it :)
* Download this tutorial in PDF
buy